
Git is a distributed version control system (DVCS) that allows you to restore specific files to a previous state, revert the entire project to an earlier version, track changes over time, identify who last modified a file that might be causing an issue, determine when and by whom a problem was introduced, and much more. It is a very powerful tool honoured with a few thick textbooks (here is just one example). You can download git from the official website. They also have great multilingual documentation.
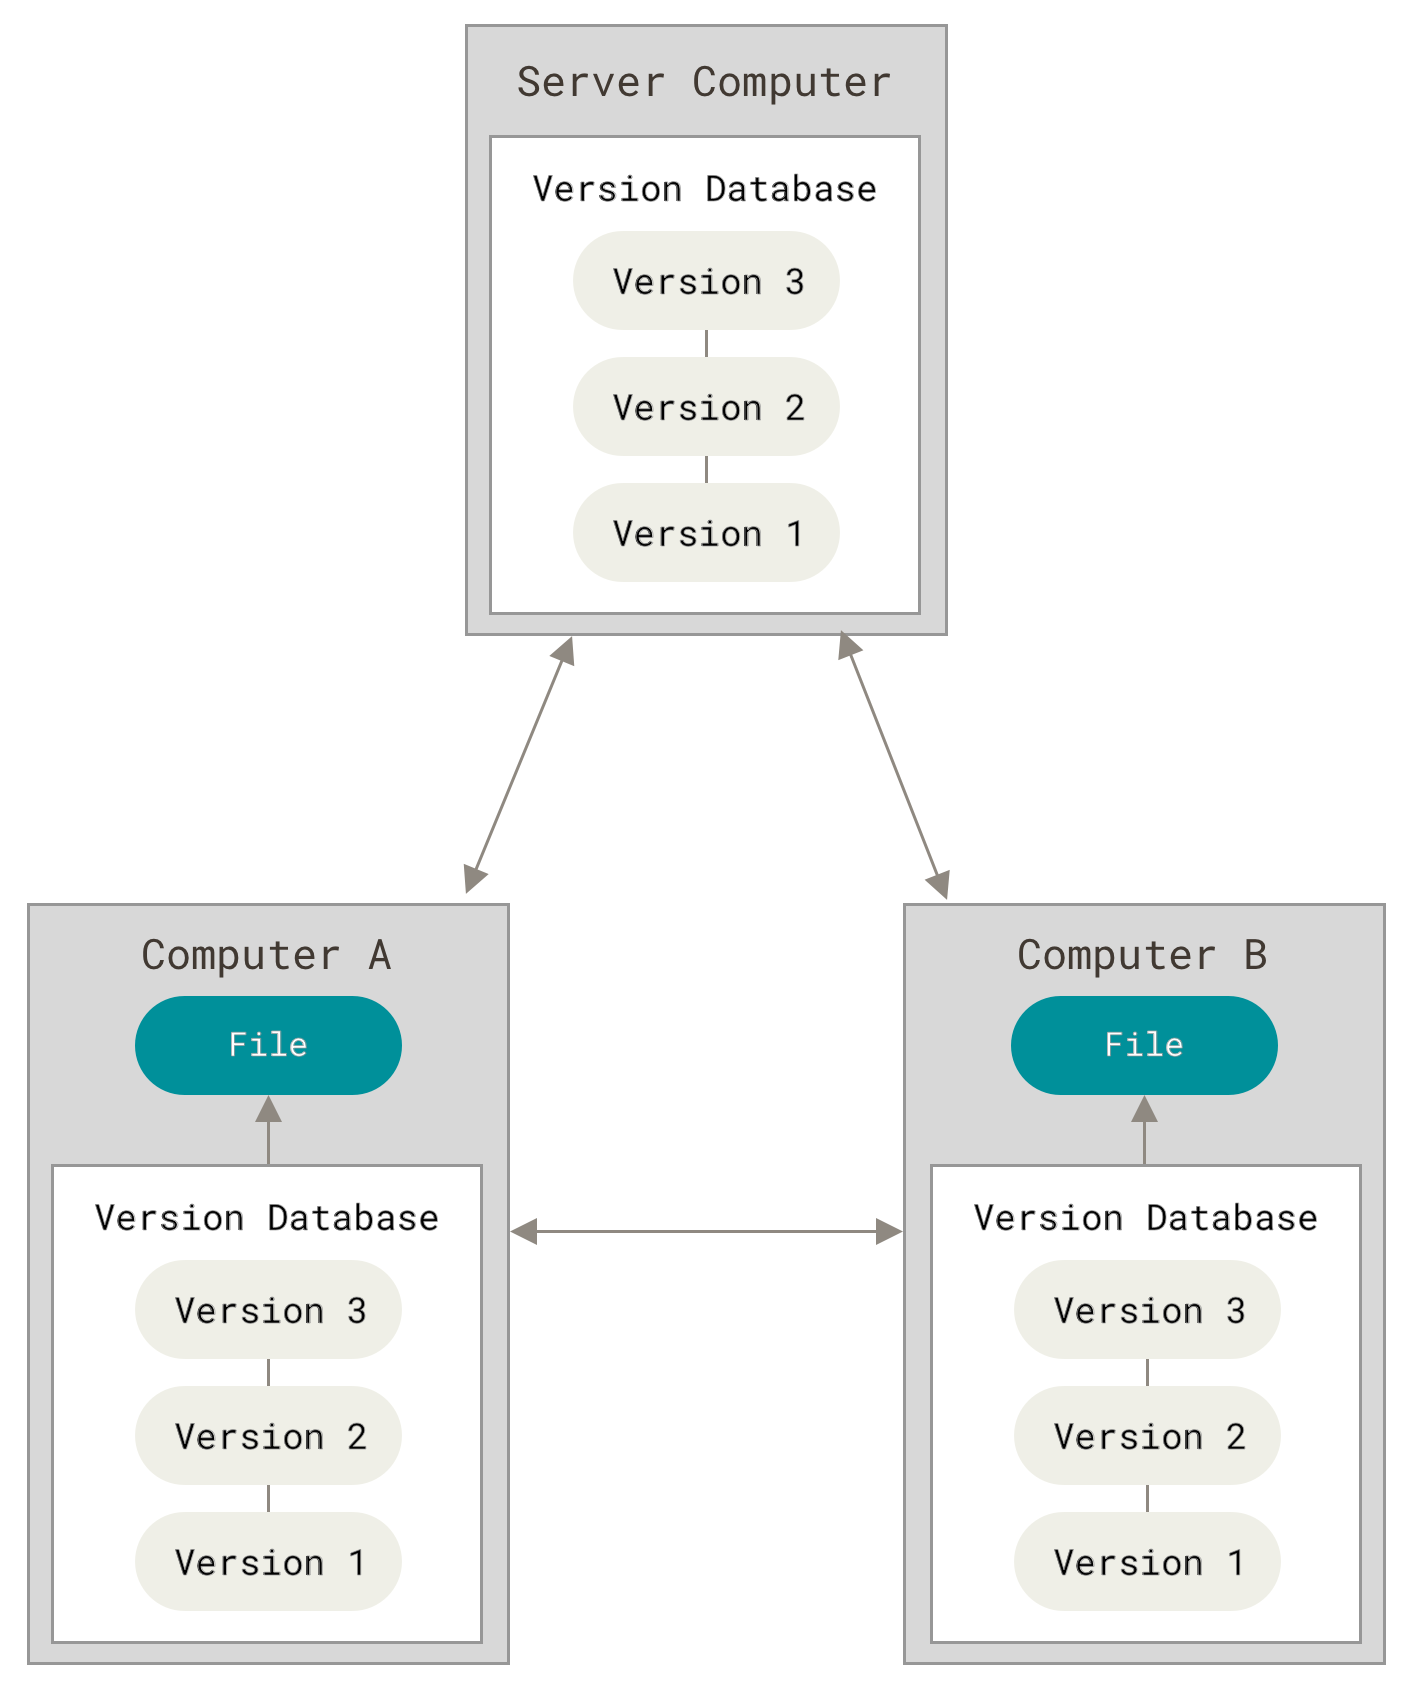
In Git, you keep a copy of your files and change history on a server, from which you or your collaborators can download, or clone it. Then, every collaborator with a local copy can contribute to the project by uploading, or pushing changes to the server.
Git has three main states that your files can reside in: modified, staged, and committed.
Modified means that you have changed the file but have not committed it to your database yet.
Staged means that you have marked a modified file in its current version to go into your next commit snapshot.
Committed means that the data is safely stored in your local database.
This leads us to the three main sections of a Git project: the working tree, the staging area, and the Git directory.

The working tree is a single checkout of one version of the project. These files are pulled out of the compressed database in the Git directory and placed on disk for you to use or modify.
The staging area is a file, generally contained in your Git directory, that stores information about what will go into your next commit. Its technical name in Git parlance is the “index”, but the phrase “staging area” works just as well.
The Git directory is where Git stores the metadata and object database for your project. This is the most important part of Git, and it is what is copied when you clone a repository from another computer.
You modify files in your working tree.
You selectively stage just those changes you want to be part of your next commit, which adds only those changes to the staging area.
You do a commit, which takes the files as they are in the staging area and stores that snapshot permanently to your Git directory.
Each file in your working directory can be in one of two states: tracked or untracked. Tracked files are files that were in the last snapshot, as well as any newly staged files; they can be unmodified, modified, or staged. In short, tracked files are files that Git knows about.
Untracked files are everything else — any files in your working directory that were not in your last snapshot and are not in your staging area. When you first clone a repository, all of your files will be tracked and unmodified because Git just checked them out and you haven’t edited anything.
As you edit files, Git sees them as modified, because you’ve changed them since your last commit. As you work, you selectively stage these modified files and then commit all those staged changes, and the cycle repeats.

Adapted from https://git-scm.com/book/en/v2
git from https://git-scm.com/downloadsgit using the detailed installation instructionsAfter you install git on your machine, there are two important things to do.
git config --global user.name "your name / github login"git config --global user.email "the email you registered with on github.com"| Command | Action |
|---|---|
| git init | Create a local repository |
| git clone | Clone a repository from server |
| git pull | Pull changes from a remote repository |
| git status | Check the status of local changes |
| git add <PATH> | Add selected files/folders to be tracked |
| git add * | Add all files to be tracked |
| git rm | Delete files |
| git commit -m "Commit message" | Commit changes; -m is for commit message |
| git push | Push local changes to remote |
| git log | Check log |
In this example, we clone the repository of our Digital Tools for Research Workshop series from GitHub to a Windows machine, create a file called test.txt with a message Hello world!, add it to be tracked by Git, commit the changes and then push them to the remote repository on GitHub.
git clone https://github.com/universityofgalway-library/digital-tools-workshops.git
cd digital-tools-workshops
copy con test.txt
Hello world!
git add test.txt
git commit -m "Added test.txt"
git push
NB! To push files to a remote repository, you need to have write permissions, i.e. to be the repository owner or collaborator.
One of the common undos takes place when you commit too early and possibly forget to add some files, or you mess up your commit message. If you want to redo that commit, make the additional changes you forgot, stage them, and commit again using the --amend option.
git commit --amend -m "Commit message"
Create a commit, opposite to the last one. This is safe.
git revert HEAD
Reset commit history to a specific commit. This is dangerous!
git reset --hard <commit id>
git rm --cached <FILE_NAME>
Example: git rm --cached siteconfig.json
Git doesn’t explicitly track file movement. Under the hood, renaming a file is two operations: deleting one file and adding another, identical one with a different name.
echo "Hello world\!" > test.txt
git mv test.txt hello.txt
These two commands do the same.
git reset HEAD <filename>
git restore --staged <filename>
These two commands do the same.
git checkout -- <filename>
git restore <filename>
You can find more detailed information about correcting mistakes and undoing changes in the official documentation.
Remote repositories are versions of your project that are hosted on the Internet or network somewhere. You can have several of them, each of which generally is either read-only or read/write for you.
git remote
git remote -v
git remote show <REMOTE_NAME>/<BRANCH_NAME>
git remote add <REMOTE_NAME> <REMOTE_URL>
git remote add elexis-eu https://github.com/elexis-eu/lexonomy.git
git remote rename <OLD_REMOTE_NAME> <NEW_REMOTE_NAME>
git remote rename elexis-eu elexis
git fetch <REMOTE_NAME>
git fetch --all
git remote remove <REMOTE_NAME>
git remote set-url origin <NEW_URL>
git pull = git fetch origin + git merge
git push = git push origin master
A branch in Git is simply a lightweight movable pointer to one of the commits. The default branch name in Git is master, or main. As you start making commits, you’re given a master branch that points to the last commit you made. Every time you commit, the master branch pointer moves forward automatically. A development branch is used for long-term work before it is ready to be merged into master. A topic branch is a short-lived branch that you create and use for a single particular feature or related work. You can have as many branches as you like and name them as you like.
A detailed guide on branching is available on the official Git website.


Image source: https://git-scm.com/book/en/v2/Git-Branching-Branching-Workflows
git branch -vv
Create a new branch.
git branch <BRANCH_NAME>
Move to this branch.
git checkout <BRANCH_NAME>
There is a shortcut for it.
git checkout -b <BRANCH_NAME> = git branch <BRANCH_NAME> + git checkout <BRANCH_NAME>
Add a new branch to the remote. This moves HEAD to point to this branch.
git push origin <BRANCH_NAME>
Get a new local branch from the remote.
git checkout <REMOTE_BRANCH_NAME> = git checkout --track origin/<REMOTE_BRANCH_NAME> = git checkout -b <LOCAL_BRANCH_NAME> origin/<REMOTE_BRANCH_NAME>
git checkout -b serverfix origin/serverfix = git checkout --track origin/serverfix = git checkout serverfix
Checkout to a master/main branch (the one, into which you'd like to merge another branch).
git checkout master
Merge a branch and delete it after merging.
git merge <BRANCH_NAME>
git branch -d <BRANCH_NAME>
Occasionally, this process doesn’t go smoothly. If you changed the same part of the same file differently in the two branches you’re merging, Git won’t be able to merge them cleanly, and you'll have to resolve conflicts manually in a text editor. A good habit that helps to avoid resolving extra merge conflicts is to do a git pull before you commit something.
git branch --move <OLD_BRANCH_NAME> <NEW_BRANCH_NAME>
Change the name locally.
git branch --move master main
Change the name of the remote branch.
git push --set-upstream origin main
Delete the remote branch with an old name. git push origin --delete master
With the rebase command, you can take all the changes that were committed on one branch and replay them on a different branch.
Often, you’ll do this to make sure your commits apply cleanly on a remote branch — perhaps in a project to which you’re trying to contribute but that you don’t maintain. In this case, you’d do your work in a branch and then rebase your work onto origin/master when you were ready to submit your patches to the main project. That way, the maintainer doesn’t have to do any integration work — just a fast-forward or a clean apply.
git checkout <BRANCH_NAME>
git rebase master
You can find information about the changes you and your collaborators made in the log. There are many options for viewing logs, but the simplest one is the git log command. It will display 3 last commits with commit hash, commit message, commit author and date. If you want to see earlier commits, press Enter, and the log will continue. If you want to exit, press q.

git log --graph --decorate --oneline

git log --graph --full-history --all --pretty=format:"%h%x09%d%x20%s"
A customised multicolour branch topology:
log --graph --abbrev-commit --decorate --format=format:'%C(bold blue)%h%C(reset) - %C(bold green)(%ar)%C(reset) %C(white)%s%C(reset) %C(dim white)- %an%C(reset)%C(auto)%d%C(reset)'

 Image source: https://stackoverflow.com/questions/1838873/visualizing-branch-topology-in-git
The Library proactively supports and enhances the learning, teaching, and research activities of the University. The Library acts as a catalyst for your success as University of Galway’s hub for scholarly information discovery, sharing, and publication.
Library
University of Galway
University Road,
Galway, Ireland
T. +353 91 493399
